Answers
Configuring a new authorize.net account
Authorize.Net is a widely used payment gateway service that allows businesses to accept credit card and electronic check payments online. It provides a secure and reliable platform for processing transactions and managing payment data.
An Authorize.Net account is essentially a merchant account that enables businesses to accept payments from customers using various payment methods.
Below are the steps to follow for configuring a new authorize.net account:
Step #1 - Configure Fraud Detection Suite
Authorize.net has a tool called Fraud Detection Suite which contains several options for identifying potential fraudulent transactions. These settings must be updated correctly, otherwise, customers may sometimes not be able to complete a purchase.
Click Home on the top toolbar, then go to Fraud Detection Suite located on the left menu under the “Tools” section. There are only two filters that you must enable and configure:
Enhanced AVS Handling Filter
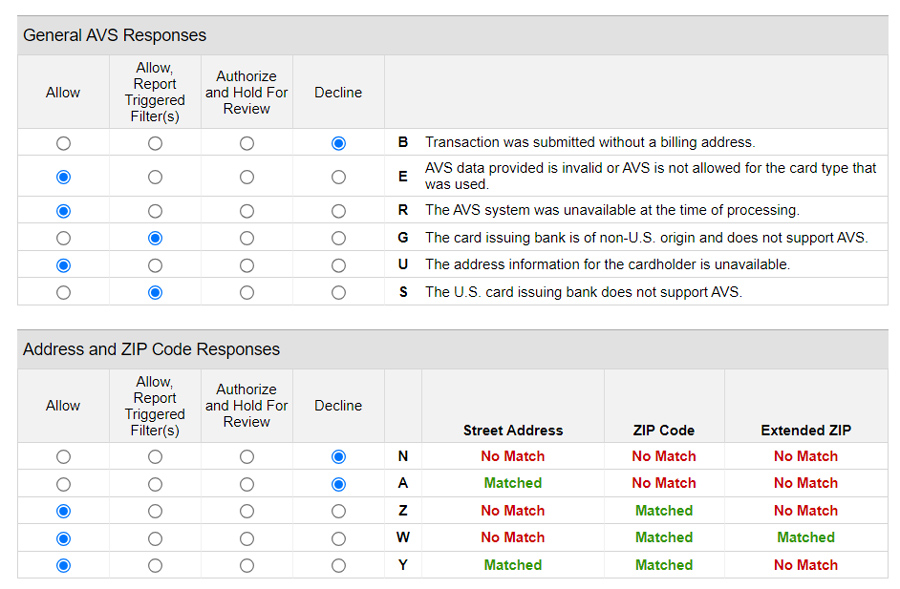
Enhanced CCV Handling Filter
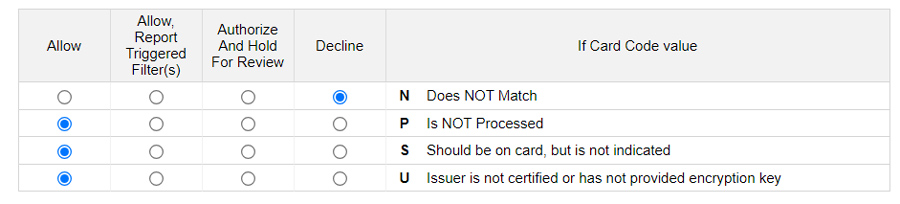
These are the only two filters that you must enable. The rest of the filters are optional and of those, the only two that we would suggest even considering are Suspicious Transaction Filter and Amount Filter. We do not recommend even considering any other filter.
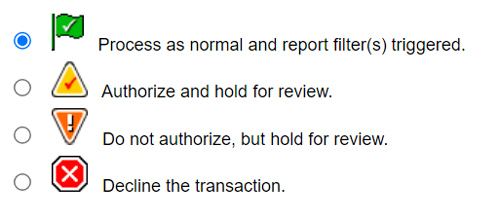
IMPORTANT: Regardless of which filter you enable, never choose an option that includes “Hold for review” as this will interfere with online and in-person sales.
Step #2 - Disable Email Receipt
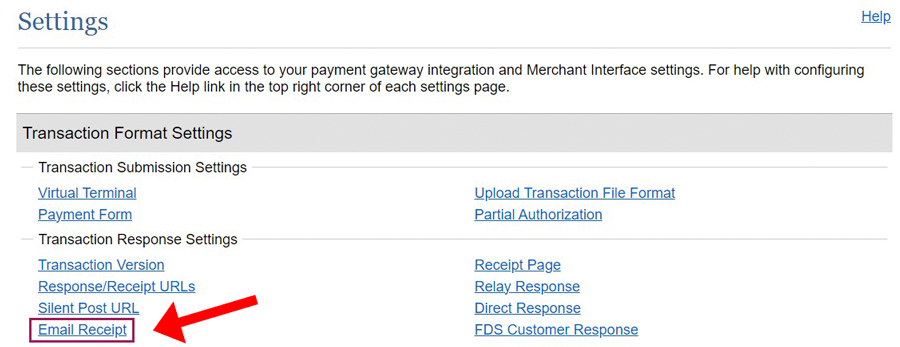
Next, make sure that your Authorize.net does not send an email to your customers when they place an order as they will get their email confirmation directly from Purplepass.
Within your Authorize.net account, click Account on the main toolbar, then click Email Receipt located under the Transaction Format Settings section. Uncheck "Email transaction receipt to customer (If email address is provided)" and then hit submit to save.
Step #3 - Ensure Test Mode is disabled
From the Settings page Test Mode under the Security Settings section and make sure that the account is set to “Live”. If it is in “Test” mode, toggle the switch over to enable “Live” mode.
Step #4 - Setting API Login ID and Transaction Key
There are two codes you need to enter into Purplepass in order to link them together. To get these codes, go to API Login ID and Transaction Key located on the Settings page under the Security Settings section.
The first code you will need is the API Login ID. It will be displayed there on the page. The second code you will need is the Transaction Key.
To create a Transaction Key, enter the answer to your secret question and a new key will be assigned. Save this key somewhere as it will no longer be displayed once you leave the page. With both API Login ID and Transaction key in hand, you can do the final step.
Step #5 - Link your Purplepass and Authorize.net account
Login to your Purplepass account and go to Settings -> Merchant Account. Select "Use a 3rd party merchant account" and then enter your company name (Which will be displayed on the receipts), your API Login ID, and the Transaction Key.
The Discount Rate and Transaction Fee is an option, but if you enter these values (What you are paying on your merchant account), this will be added to the service fee charged to the customer in order to offset the cost of accepting credit cards.